

I live in the old city of Amsterdam, in a 350 year old house. Like a lot of people, my circumstances limit my ability to install solar panels on my house. While not many people may live in such an old house, many are renters and may not be able to get permission from their landlord or live in an apartment building and not have access to their roof. In some cases the local authorities may not allow connecting solar panels to the grid.
In my case, even if the city let me, my roof is 30 or so years old, and too old to consider putting holes in it. I’m also not likely to get the necessary building permits from the city to install solar panels. I am however allowed to lay something on my roof, and am allowed to make temporary installations. As long as whatever I do does not change the structure of my house, is not visible from the street and can be removed if necessary, the city is not likely to bother me.
In addition, solar panel technology is rapidly evolving, and in the last few months a number of new possibilities have come on the market.
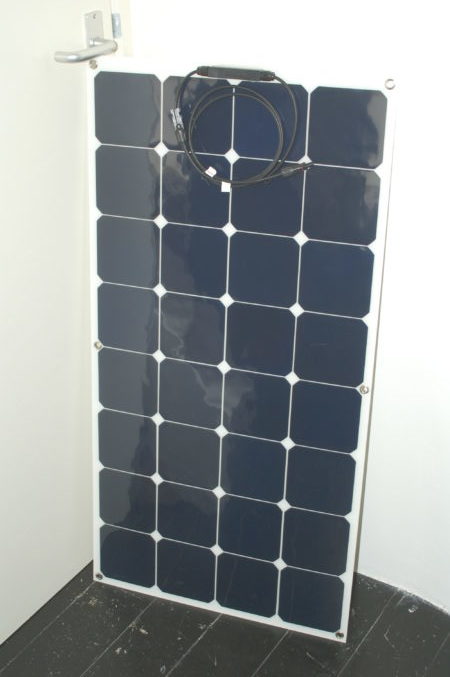
As a test, I bought the solar panel you see above, a 500w grid tie inverter:
And a meter, which is visible above connected to the inverter:
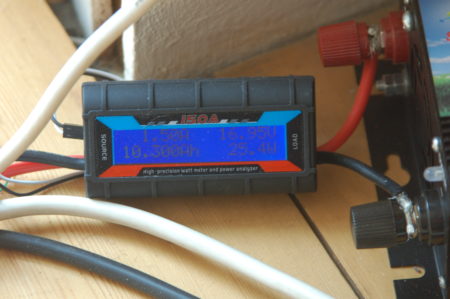
The meter cycles through a number of different readings, showing watts, watt hours, amps and so on. Pretty much everything you need to know. One side connects to the solar panel(s), and the other side to the grid tie inverter.
The purpose of this post, and the ones that come later, are to take you through some of the thought processes involved in designing your own solar system like this.
Solar Panels
The solar panel pictured above is a new kind, laminated in plastic, and weighs about 1kg. They are flexible, and can be bent to about 30 degrees. It’s easy to carry a stack of 5 of them, under your arm, and up the stairs. You can install them in an area that gets light foot traffic, and walk on them with soft soled shoes. They have grommets in the corners, and you can tie them down with rope, or mount them on a wall with 4 screws. You can also glue them to a vehicle or home roof. They are intended for temporary installation, and so often don’t require a building permit to place on your house. Even though they are intended for temporary installation, they are just as durable as the older glass panel type.
It’s not really the purpose of this post to do product reviews, so I won’t mention the brand. In fact this same type of panel is made by different manufactures, and they all seem very similar. I suspect they are all more or less the same. They all seem to be made in China, but I think the technologies were developed in the Bay Area in the US and are being made under license.
The price of these panels is coming down very quickly right now. If you are considering buying some, you might want to wait. The panel I bought for testing cost €180, I recently ordered 5 more to expand my setup for €160 each, and I now see they are going for €130. In a year or two they will probably be much cheaper.
These panels are so-called 12v panels, even though they really operate at 18v. I guess they’re called 12v because, they are suitable for charging a 12v battery, if your system uses batteries. The voltage they produce is dependent on the load and amount of sunlight, as well as the temperature of the panel. They also have a Voc, or maximum possible voltage of 20v. This is an important number, because equipment is easily damaged by over-voltage, so you want to make sure anything you connect it to is within it’s Voc rating.
System Voltage
If you use equipment that’s designed for a higher voltage, it’s easy to achieve this by combining solar panels in series. When you connect the positive lead of one panel, to the negative lead of another, then use the remaining unconnected leads, you have the equivalent of a 24v panel (that really operates at 36v, and has a Voc of 40v). If you connect more than 2 in series, the voltage continues to increase in a similar way.
If you connect the panels in parallel, the voltage stays the same but the current increases. The current will double with 2 panels in parallel, triple with 3 panels in parallel, and so on. Most equipment like inverters is not damaged by the presence of too much current, but you have to be careful not to use cabling and connectors with equipment that may draw more power than they can handle. You can think about this in comparison with household appliances, for example a table lamp or a mobile phone will need one thickness of wire, whereas a washing machine or oven will need a larger cable.
In terms of the cost of a solar system, lower voltages tend to need simpler and cheaper equipment, but heavier and more expensive cabling. If you try to work at the extremes, for example trying to do everything at 12v or everything at 100v+, you are likely to find yourself developing a very expensive system of solar panels. Also, except for combining solar panels like I describe above, using equipment to change to another voltage, is also likely to be expensive and limited in it’s capacity.
Also, if you’re tempted to try to connect your system of solar panels to multiple devices, for example a combination of battery charge controllers or inverters, you are also likely to find yourself limited. Some brands of inverters or charge controllers are ‘stackable’ with the same brand, but you are likely to have a lot of issues with load balancing and race conditions, where one device draws all the power. You have to be very careful with cable length, and mixing technologies like MPPT and PWM (more on these later). Here’s a video that explains this a little. In general, you need to match a single solar panel or combination of panels, at a single voltage, to a single device.
Meter
The meter I use pictured above cost about €15, and works well enough. It’s really only useful for testing and not gathering long term information, because it only goes up to about 8kWh, then resets to zero.
You can see on the left side of the picture, some small wires. There are small pins which you can connect to a supplemental power source. This is necessary, because the meter itself requires some power to operate and retain it’s memory. It can draw this from the solar panels, but of course only during the day. At night, there is no power available, and so it loses it’s stored information. You can connect to the pins with jumper wires used with circuit breadboards, that have a female end. For example, these. The minimum required voltage is 4.6, so I cut off the micro USB connector from a standard USB charging cable, and exposed the red and black wires in the cable. I then used a standard USB charger for the power source.
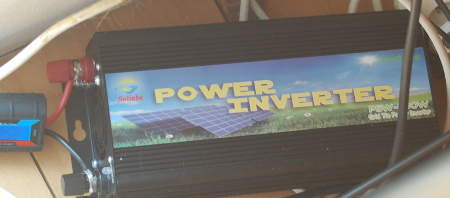
Grid Tie Inverter
With a solar system you can either use a system of one or more batteries, a grid tie inverter, or both. A grid tie inverter simply connects to your household wiring, and feeds power back to the grid. In my case, the one I bought is designed to simply plug into a standard outlet. It works very well and is trouble free.
There are different suggestions on the Internet, but mostly the suggestion is that if you feed back more than 450W, you should use a dedicated circuit. In other words, you should hire an electrician or install a dedicated fuse in your fusebox for feeding back onto the grid. I would take particular care when using a circuit that has sensitive appliances, like computers or those that use high power like ovens or washing machines.
What happens when you feed back onto the grid? For most people, in most cases, your electric meter will turn backwards. The main exception to this is if you have a so-called smart meter, that can detect the direction of the current and records this together with the time of day. Even modern digital meters will usually just turn backwards when you feed power back.
In most cases you can do this without prior arrangements with the utility company, although this may be illegal or against the policies of your utility company. Consider that it may not be appreciated if your utility company comes to read your meter, and you have a negative usage.
In this way, using a grid tie inverter is like using the power grid as a giant battery, feeding it when you have surplus power, and drawing from it when you need power. Your electric bill is calculated as the net.
The argument is sometimes used that safety can be an issue in unauthorized feeding back to the grid, especially during a power outage. You have to consider this yourself, but modern grid tie inverters have what’s known as anti-islanding protection, where they will automatically shut off during a grid failure.
MPPT and PWM
PWM is the standard type of charge controller. If you have a relatively small solar panel setup, this may be enough, and they are much cheaper than MPPT. MPPT (Mamimum Power Point Technology) is included with many inverters and the more expensive battery controllers. Solar panels perform better at their working voltage (18V for 12V panels), and if you attempt to draw too much power from them, the voltage will drop and they will become less efficient. MPPT attempts to maintain the ideal voltage, but some products implement this differently than others, and are more or less effective.
Most serious solar panel systems will use MPPT.
With MPPT charge controllers it is technically possible to use different voltage on the solar panels than on the batteries, but the charge controllers that do this at higher currents are very expensive, and there are limits in any case. You will find it difficult to maintain large differences.
My Setup, Issues and Specifications
The solar panel I bought to test, pictured above, is 100cm x 50cm. I have two places on my roof, one for a row of 6 of these, and another place for a row of 8. I have another spot on my roof terrace wall for 2 more, and beyond that there are a few places where I might put more if necessary, but they wouldn’t be convenient. In short, I have a convenient place for 16x 100w solar panels. Some will get more light than others.
My electric bill is about €500 per year, about €100 of which is paid by a subsidy that I would receive in cash if I didn’t use the electricity. My goal is to bring my electric bill somewhere between the total amount, and the total amount less the subsidy. If I generate more electricity than I use, the amount paid back to me by the utility company is trivial. It’s not my intention to generate 100% of my own electric needs.
I have done some calculations, making some assumptions that may or may not be true, that suggest a 2kW solar panel system would meet all my electricity needs and cost €4000. This should mean it pays for itself in 8 years. Since I have convenient space for a 1.6kW system (16x 100w solar panels), I will make due with this and perhaps look for ways to make my house more energy efficient to make up the difference. I’m expecting to spend €3000 in total, and will do it step by step rather than installing a large system in one go. As I expand, I will look for ways to eliminate bottlenecks and use the cheapest and most efficient technologies and products.
Results of My Test
At the beginning of this post I explained I bought a solar panel, meter and inverter to test. The idea was to learn about the equipment, the sun conditions on my roof and so on. In broad terms the test was a success and proof of concept, but I also learned some things.
First of all, while the meter one time recorded 104w from my 100w panel, proving it is working to specifications, that was really an exception. In general, the efficiency was much less than that. I never personally witnessed the panel generating more than 75w, and doubt it frequently goes beyond that.
This is probably due to the angle of the sun with respect to my roof. On one hand this means some of my expectations weren’t met, however my original calculation that I need a 2kW system does seem to be correct. This is because while the peak output of the panels are not as high as I expected, the panels are unexpectedly good at lower light conditions. In particular, on a cloudy day, the panels can usually generate 50W, and in the evening with no direct light, but a lot of indirect light, they can usually do 25W. Normal panels are about 15-18% efficient, but these are rated at 22-24%, and that may be the difference.
Because the panels rarely reach their peak performance, I can think about using a cheaper grid tie inverter, one that’s rated for fewer watts. This is because when if the panels do generate more power than expected, the excess power will be wasted, but if this doesn’t happen often, not a lot will be lost.
One issue that came up was the size of the cables needed. As a rule of thumb, you need a 4mm cable for up to 30amps, and a 6mm cable for 50amps. These are very heavy cables, and since they are designed to be in the direct sun and outdoors, they are covered with a thick and heavy layer of insulation.
For a 1600W system, the number of amps is calculated by dividing by the number of volts. So,
A 12V system (operating at 18V) would be 1600/18 = 88 amps
A 24V system (operating at 36V) would be 1600/36 = 44 amps
After pricing various options, and taking into account that I already had one 500w 12v grid tie inverter, I came to the conclusion that I would need 2x6mm cable pairs. One of the pairs would be 12v and the other would be 24v. It might also be possible to start at 12V, using what I have, but then later switching to 24V.
I went over and over these calculations, and was really looking for another solution. These cables are not only expensive, but very heavy and would be difficult for one person to manage. The main problem was this:
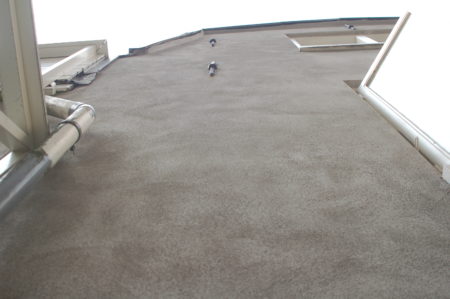
This is the view up from where the cables would run. It would be a 6-7 meter straight drop from the edge of my roof, and the cables themselves weigh some 10’s of kilos. I may eventually need to run 2 pair of them, about 50kg combined, and drill holes in my 350 year old wall for them. If something happened, and one or both of them dropped, the weight would potentially bring the solar panels off the roof with them, or at least rip the wiring out of the panels. This would have been a lot of trouble to install securely.
They needed to come this far down, because this is where I both had a dedicated circuit to connect them to the house electric wiring, as well as space for inverter(s) and batteries.
The Solution, and the Next Step
I have a spot on my roof good for 6 panels, and already have the one panel I bought to test with. I will later expand to 16 panels in total, but buying 5 more now is a good step. What you see a little to the left in the picture above is this:

And more specifically, this in the bottom center:
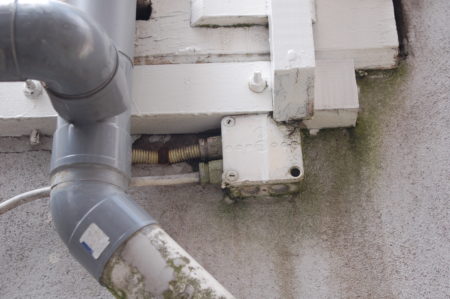
This is a disused junction box, for an outdoor light. There’s already a hole in the wall for this, and as it turns out, it’s on it’s own electric circuit.
Together with the 5 new panels, I will buy an outdoor grid tie inverter, what’s sometimes called a micro-inverter. This will convert the power from the solar panels into electricity suitable for feeding back to the grid, at the level of the roof, eliminating the need to run heavy cables down the back of my house. A normal electric cable can be used for connecting it to the junction box in the picture.
More on this in a future post!


