Nitrogen Fixing Bacteria

If you grow any plants that are a member of legume family there is a very important bacteria needed in the ground you may not be aware of.

Leguminous nitrogen-fixing plants as they are called include all green and dry beans, lima beans, garbanzo beans, soy beans, fava beans, peas, field peas, clover, alfalfa, vetch, peanuts, lentils and probably others.

These plants are unique in their ability to absorb nitrogen from the air and fix it into the ground. This means these plants are normally able to provide most of their own fertilizer, and so can often be grown in very poor soil with little or no added nutrients. In fact these plants will usually leave the soil richer than before they were planted. In between growing other crops, farmers and gardeners often plant ‘cover crops’ that are intended to fix nitrogen into the ground and otherwise improve it.

These plants depend on the presence of a rhizobia bacteria in the ground. This bacteria does not normally occur naturally in the ground, and many gardeners will have to establish it themselves. Gardeners are often unaware they need to do this. Once it is established, it normally persists for a very long time and so is no longer an issue.

There are four different strains of rhizobia bacteria, and you must have the proper strain for the particular crop you are trying to grow. There is one strain for soy beans, one strain for garbanzo beans, one strain for clover and alfalfa and one last strain for most other plants. If you establish one strain of bacteria then grow something that requires a different strain, you will need to establish that strain separately.

If this bacteria is not present in the ground you can expect very poor crop performance.

Sometimes packages of seeds are labelled with a warning about this bacteria, but few warnings go so far as to tell you you will probably have a partial or total crop failure if you lack this bacteria. It is very important to establish this bacteria in your ground if you are growing these crops!

There are several ways to establish this bacteria. If you have been growing these crops already for a number of years, you probably already have it. If you or a neighbor have some land where this bacteria is already established, a few shovelfuls of dirt are often all that is required to establish it in a new spot. The bacteria will also usually establish itself, so you may be able to just wait through a year or more of poor harvests until it is finally in the soil. Finally you can establish this bacteria by using an inoculant (see below).

A common technique to firmly establish the bacteria in a particular spot is to make two successive plantings of the same sort of plant, even if you have to temporarily set aside good crop rotation practices.

Finding a supplier for inoculant can be difficult. In the UK there is a single manufacturer, Legume Technology Ltd. People living in the US can often simply find it at a garden center, but it is usually only the strain of the bacteria used for garden peas and beans. If you want other strains, or you want to order it by mail, Bountiful Gardens is a good source. Bountiful Gardens will also ship overseas, so they are a good source for people living outside of the US as well.

Garlic!

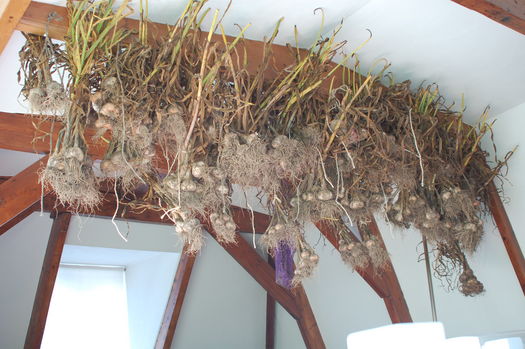
Garlic Hanging from Ceiling

Our harvest this year was about 200 bulbs of 20+ varieties.

This picture shows it hanging to dry and cure from our living room ceiling.

Past and Pending Trials

In the comment discussion of my previous post, it occurred to me I never explained that most of what I do in my garden are trial plantings.

I have been gardening the same bit of land now for 2+ years. The first year I didn’t know what would grow there, so I planted a bit of everything. What grew well were beans, peas, cole plants, beets and chard, carrots, leaks, celeriac (celery root) and garlic.

The next year, I did more trials with things like turnips, rutabagas, wheat, and spelt. I also did expanded plantings of some of the things that had done well the previous year. I planted about 30 different cole plants, 5 different carrots, 28 different kinds of garlic and related plants, 10+ kinds of beets, 10+ kinds of swiss chard, and so on. What did well were the garlic (but it’s not yet harvested), the purple cauliflower and red brussel sprouts I posted about before, several carrots and peas.

At this stage many things are not clear. Many things that did well the first year, didn’t do well the second like the cole plants and beets. I also had problems getting my wheat seed to germinate. Many of these things can be attributed to weather, weed infestations, planting depth or distance problems, watering issues, soil fertility, pest or other problems. Some of these things are just not clear what went right or wrong. In any event, more future trials will probably shed some light on these things.

There are many goals in these trials. What grows well in my garden, what tastes good, what has pest and disease resistance, what has high yields, what fits well in rotation schemes with other plants, from which plants is seed saving practical and so on.

Often there are goals unrelated to the type of plant that can change the outcome, such as a new mulching or weed control technique. Although it’s not usually on purpose, I frequently end up with a complex set of variables in a trial. There is almost never a clear outcome to a trial.

In any given planting trial, I am happy if 50% of what I plant grows into something interesting. In the end the idea is to figure out what works best for me, then do expanded plantings and seed saving from these crops. What doesn’t do well is just discarded.

Since seed saving often means protecting plants from cross pollinating, it’s often easier to either plant many varieties in a trial or plant one variety for seed saving, but not both in the same year.

When dealing with heirloom vegetables, you are always dealing with huge numbers of varieties. For example there are thought to be 4000 different kinds of tomatoes! That’s 100 tomatoes a year for 40 years without ever planting the same one twice. It’s the same with almost all types of heirloom fruits and vegetables. There is no point wasting your time with anything that doesn’t work well for you, but at the same time half the fun is continuing to try different varieties or retrying varieties that you think deserve a second chance. When you find the right variety, you can then work on improving it by roguing out undesirable traits and not saving seeds from those plants.

So, what’s coming next for this year? In progress I have a garlic and related plant trial, and I plan to expand this with even more varieties. I have several kinds of peas, beans, carrots, beets, chard, corn (maize) and other things either planned or already planted. I’ll post pictures of whatever does well.

Container Composting

If you have limited space for composting, or are only composting a relatively small amount of waste, this may be the perfect solution for you. If you are new to composting, this is also a good way to get started.

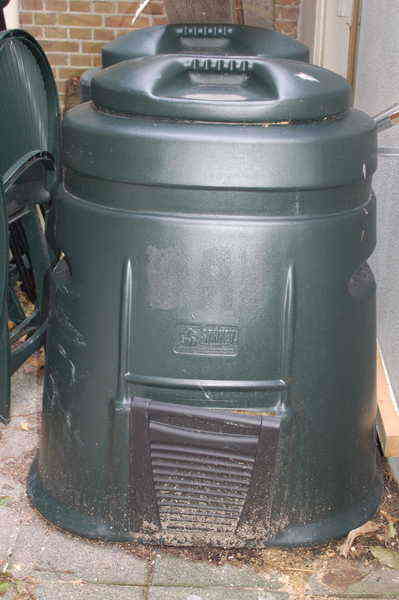
It is possible to construct your own composting container, but I won’t get into this here. By searching the Internet you should be able to find plans for this. Commercial composters are not expensive, perhaps $50, and are usually well designed. It can never hurt to have a composter that is a little bigger than you need, so be careful not to buy one that is too small. Some cities often offer discounted composters, as a way of encouraging people to recycle their household waste. Here is a picture of the one I use:

Composting Container

Some composters have moving parts, and are designed to stir the compost, but this is not necessary. The basic idea behind my composter is waste is put into the top, decomposes, then can be dug out of the bottom. Some of the cheaper composters don’t have the little door at the bottom. All composters of this type are open at the bottom, so when your compost is ready, all you have to do is lift the plastic composter off the top. I find it useful to completely empty the composter every year so having a door that let’s me dig a little bit at a time out is useful, but not very important. The little door can also be a nusance, because inevitably it will fall off or break.

The composter will hold much more than it looks like, because as you add waste it will decompose, leaving more space for more waste. Think of it like a bottomless garbage can. With a bit of luck, you may be able to fit in 10 times more waste than the actual capacity of the composter.

If you have the space, it can be useful to have two composters. This is so one of them has a chance to sit and decompose, while you are adding fresh material to the other one.

In Composting and Mulching I talked about what to put in your compost. You can add both yard waste and household waste, but many people that have a composter like this live in a city and use it only for their household waste. It’s perfect for this. Just keep an extra container in your kitchen to hold your compostable kitchen waste. You may want to line it with a paper bag to make cleaning easier, and the paper bag can just be tossed into the composter with the rest of the waste. By composting your waste in this way you can often reduce what you put into the landfill by more than 50%. There is not usually a lot of nitrogen in household waste, which can slow the composter down. If you want the composter to go faster, you can add small amounts of cow manure to increase the nitrogen content. Since fresh cow manure can burn the roots of young plants, be sure not to add any near to the time you will actually use your compost.

Composting in a container is usually faster than composting in an open pile. My compost is normally ready for use within a year. I will often use the compost a little bit before it’s really ready, and simply pick out the pieces of not yet decomposed waste and put them back in the composter.

Compost depends on micro-organisms, that in the beginning can take several months to establish themselves. In order to get these established more quickly, you may wish to find a way to add them yourself. The easiest way to do this is to hold back a couple of shovel fulls of compost from your previous batch, and add it to your next. Of course if you are starting at the beginning, you have to find another way. These micro-organisms are in store bought compost, as well as manure. There is also no reason why you can’t just wait a few months for the micro-organisms to establish themselves. You can also buy inoculant (compost accelerator) in the garden center, but I think this is kind of a waste of money considering there are other sources. In any event, inoculant won’t make the composter go any faster once the micro-organisms are already present.

Composting and Mulching

If you already make your own compost and mulch your garden, this post isn’t for you. On the other hand, if you are just beginning with gardening or with organic gardening, here is an introduction to one of the best sources of fertilizer and related to it one of the best ways of controlling weeds.

If you have a small garden, or you are primarily composing kitchen waste, you may prefer to use a composting container. In another post I am going to go into more detail on what this is. In this post I am going to assume you have too much material to compost for a small container.

When deciding where to place your compost, you should keep a few things in mind. Compost has a lot of insects in it when it decomposes. They normally don’t go far from the compost, but this means it is best located away from frequently used areas. Compost has a distinctive odor, it’s not normally thought of as objectionable, but keep it in mind if you are sensitive to such things. Compost rarely attracts animals other than a few harmless insects, but if you have an established problem with things like cockroaches or rodents, they may make their home in the compost because it is warm.

I’m going to risk scaring you off by getting a little bit technical, but hang in there. Even if you don’t understand the underlying principles, composting and mulching are easy and it’s very difficult to go wrong. Composting is simply taking waste material from your garden and decomposing it into a form of dirt, that is very rich in nutrients and can be added to the ground in your garden to make it richer.

Composting is both a chemical and biological process. There are two very important elements in your garden, nitrogen (N) and carbon (C), and composting is a chemical reaction between these two elements. Composting is also a biological process, in that it involves a variety of micro-organisims and insects. Composting will work almost no matter what you do, but will go faster if you provide C and N in the correct proportions and provide good conditions for the biological processes to take place.

N is present in almost anything green (green leaves, grass clippings and so on) and also in animal manure, but it is also present in large quantities in the air we breath. C is present in almost anything else, especially in brown colored things (sticks, dried grass and so on).

When preparing a pile of material to be composted it is important to layer it. Layering is important to improve air circulation and water flow, but also because different materials will contain different amounts of C and N, and it is good to provide a good mix of these in all parts of the compost pile. Ideally you will alternate layers that are high in either N or C, providing slightly more C than N.

It’s much more important to make layers of some sort than it is to get the N and C right, so don’t worry about the N and C unless you are trying to make your compost decompose as quickly as possible. Since there is N in the air, if your compost pile needs to adjust the amount of N it will either release or absorb it from the air as necessary, but this will take a little longer than if the correct proportions are there initially.

Since composting is also a biological process, dependent on micro-organisms, it is a good idea to try to provide a souce of these if possible. They are present in the environment anyway, and will establish themselves eventually, but you can speed things up by adding them directly to the compost pile. A good souce of them is a shovel full or two of compost, if you have already made it in the past. Another good source is animal manure. It’s also possible to buy an inoculant from a garden center, but is perhaps not really worth the money, unless you are in a big hurry.

In general you can put anything in your compost pile that was once alive, so almost any plant or animal material. There are however some things to avoid for special reasons. It is very important to put clean things into your compost, and avoid things that could pollute the ground of your garden: commercial cut flowers will contain too many pesticides, paper may contain poisonous inks and bleaches, and so on. You should also never put diseased plants into your compost, because many diseases can survive the composting process and reinfect your garden. You should avoid things that could attract animals like meats or cooked foods. You should avoid large sticks or wood, unless they are chipped first, because they will take too long to decompose. It is a good idea to avoid putting seeds or potatoes into the compost, because these may not be killed and can turn into weeds. Animal bones will take too long to decompose. Small amounts of paper are not a particular problem, but large amounts of unshredded paper will ‘clog’ the compost and interfere with airflow. Egg shells are good for the compost, because they add calcium which is needed by many plants. It is rarely a problem to put living weeds in the compost, because the composting will quickly kill them.

The use of animal manure in composting or gardening is controversal. In theory, it will provide a good source of N and will compost well. In practice, like everything else you need to insure it is clean. If your manure comes from a commercial farm, it will likely contain traces of all of the food and drugs given to the animals it came from. In addition, if it came from animals that were sick, it will likely contain these diseases. Certified organic farmers who use manure, generally have to use certified organic manure. Manure can contain salmonella and E. coli, which can survive composting to contaminate your vegetables, and make you sick.

There are certainly gardeners who swear by manure in their gardens, but it is my experience that it is of no special benefit and is best avoided or used in small quantities. In any event, fresh manure is high in soluble N like nitrates and nitrites, which can burn the roots of small plants and cause environmental pollution. If you use manure in the garden, it is important that it be well aged and composted so the soluble N becomes fixed and can be used by plants as a fertilizer. Since manure is very high in N it is important to provide a good source of C when composting it, or it may not completly decompose.

Okay, once you have chosen what to put in your compost and layered it, now you have to let it sit. While it it decomposing you should keep it moist, but not water-logged. In addition, it should be able to breath, so don’t store it in an airtight container. Normally compost needs to sit through one complete summer before it is ready to use. Stirring it more often will make it decompose faster, but normally it should be stirred at least once, preferably at the beginning of the summer that it is to sit through.

Typically, a gardener will collect material to compost over the course of a gardening season and build the compost pile at the end of it. The pile would them be stirred the following spring. Stirring usually means to just move the pile from one place to another, but it’s also possible to stir it in place.

What can go wrong with composting? The answer is not very much, at worst it just won’t work until you fix whatever the problem is. If it is too dry, it will just stop decomposing until it is wet again. To avoid the compost pile from getting washed away, surround it with a fence or other border. If it is too wet or doesn’t get enough air, it will become a ‘stinking rotten mess’. Besides smelling bad, this isn’t very serious, just fix the problem and the smell will go away.

Even a ‘stinking rotten mess’ will decompose into compost eventually . It does this with an anaroebic (meaning without oxygen) process which takes longer, but still works. Another example of something that works with an anaerobic process is a septic tank.

If your composting is going well it will get very hot. Perhaps as high as 60C (140F). This is a good thing when it happens because it can kill seeds that may later turn into weeds, and many plant diseases can be killed as well. In addition, heat in turn makes the composting process go faster.

So where does mulch fit in with all of this? There are a few of the same principles behind mulch. Mulching is when you take a material like plastic sheeting, straw or wood chips and use it to cover a piece of ground that you want to protect from weeds. In part this works because it blocks sunlight from anything that might grow under it, but it also works on the same principle as composting. When mulch is rotting in your garden, it is composting, and it will destroy weeds by decomposing them. Weeds, like all growing plants, are high in N. One way that you can increase the effectiveness of mulch is to use something that is as high in C as possible. It should go without saying that it is important to keep mulch at least a few centimeters away from plants that are not weeds, or you may kill them as well.

Some mulches are also effective because they remove N from the ground. Wood chips are a good example of this. Wood chips are so high in C that when they decompose they need a source of N, and they get this from the ground. Since all plants need N to grow this makes wood chips a very effective mulch. Wood chips should be removed rather than be turned into the ground when you are ready to plant, because turning them under will make the ground N poor. Since removing them is a little difficult, they are better suited for areas around rather than in the garden.