House Foundation

It’s time for a post about something besides gardening. We live in the Jordaan, which besides the old center of Amsterdam, is the oldest neighborhood in the city. The neighborhood was built in 1680, and our house is one of the original houses, making it 325 years old. Our house is actually two houses joined in the middle, which were both built around the same time.

The city of Amsterdam has been coming by our house for the last few months, asking to inspect different things. Measuring our walls, inspecting the general state of the structure of our house, and so on. One day a few weeks ago, they came by and said they wanted to inspect the foundation. They wanted to dig two holes, one for each of our two houses, along the edges near our neighbor’s houses with the hope of being able to inspect their foundations as well. For one of the holes, they were going to have to break up our cement floor. For those of you reading this who have never been to Amsterdam, you need to understand that almost all houses here are built next to each other, touching on their sides.

We had mixed feelings about the city doing this. In theory, it was possible to refuse to allow the inspection, but if we had done this they city would have come back again and again. As home owners, we didn’t really want to know of problems with the the foundation when it came time to sell our house, because we were going to have to reveal what we know. At the same time, if our house is going to collapse, we thought it would be a good idea to know this now, and do something about it. Also, if we let the city inspect it, the city was going to have to pay for the inspection. Anyway, we agreed to the inspection.

Our house is pretty typical, in that it is a brick house with a wooden foundation. We live almost at sea level. Our house is above sea level, but most of our foundation is below sea level. The idea is that as long as the wood stays submerged, it won’t rot. If it ever dries out, it will rot very quickly. The bricks of our house, and the wooden piles in our foundation, are separated by a flat wooden plank that holds the house on the piles. The piles go down about 4 meters.

There have actually been two issues with our house. The first, as with nearly all houses in the city, the 4 meters the piles of our foundation go down is not enough, and our house is sinking. Our house is sinking at the rate of about 1-2mm per year and, because it’s been doing this for a long time, it’s getting pretty low. The other more pressing issue is that on the far sides, our two houses are sinking faster. This latter issue was what was concerning the city the most.

Okay, so they dug the two holes. First on the east side of the house:
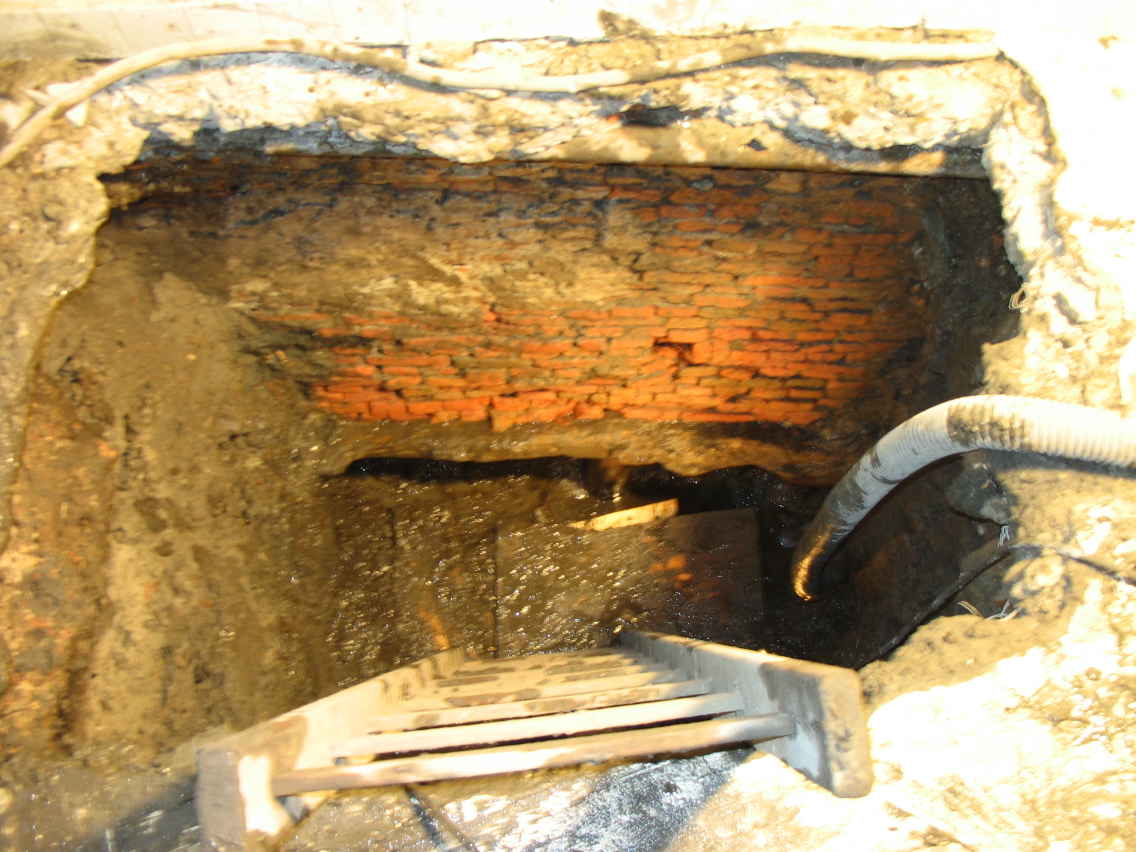
Foundation - East Side

At the top of the picture you can see our cement floor. Below this, you can see the brick wall that leads down to the wooden plank separating the piles from the house. One wooden pile is visible. This hole is about 2 meters deep, and is just wide enough for a person to stand.

When they dug this hole, a city architect along with a team of inspectors came to take a look. It was clear the situation was bad. Several of the piles were rotten, and others had slipped out from under the house.

On the west side of the house:
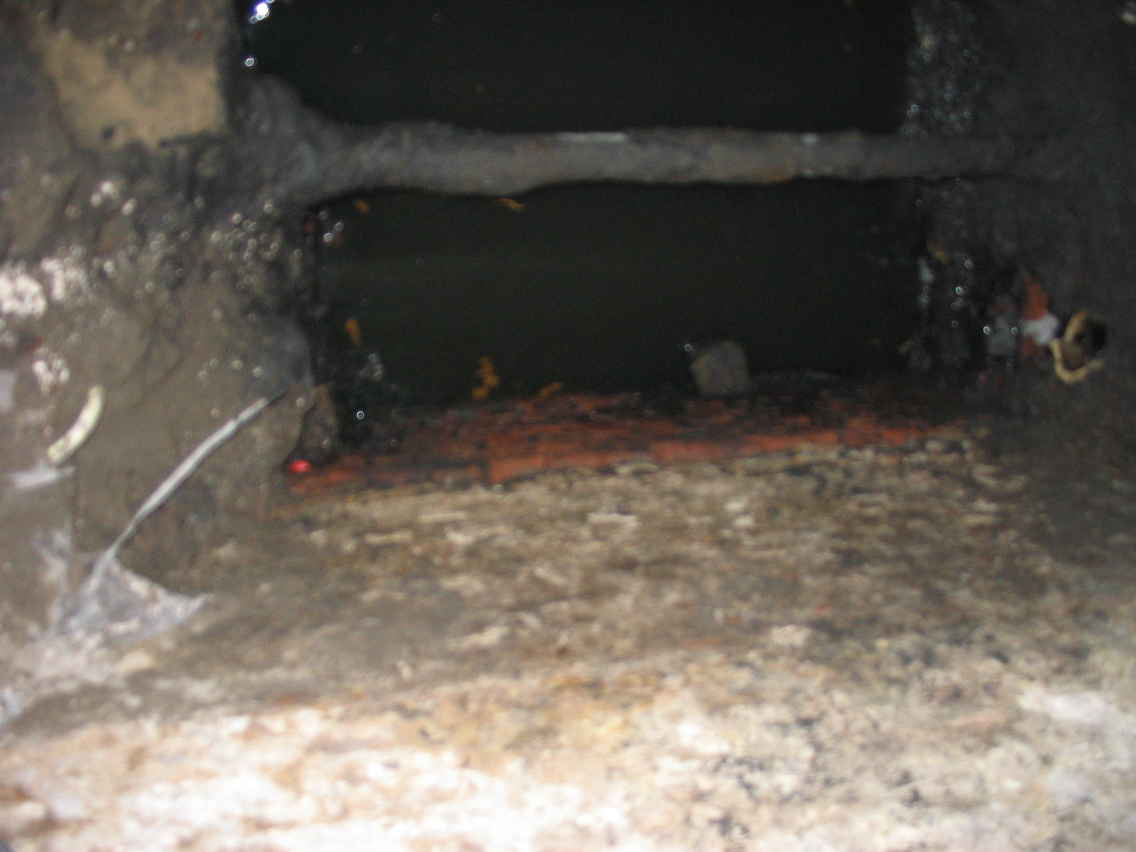
Foundation - West Side

Here things got a little dirty, because among the many pipes going under the ground here, there was a sewer line that they broke in the process of digging. This hole only goes down a little more than a meter, and at the bottom you can see a wooden pile that has slipped out from under our foundation.

So, what was the conclusion? We still don’t know. It’s clear the past 325 years have not been kind to our foundation. On both sides there is rotten wood and the house shows signs of slipping off the foundation. What we don’t know is how stable the situation is, or what exactly we need to do. We are expecting the city to tell us more later.

Saving Tomato Seeds

Tomato seeds are one of the easiest types to save. Tomato plants are mostly inbreeding, meaning it’s unlikely tomato plants will cross pollinate with each other and plants grown from the saved seeds will produce more tomatoes of the same type.

Seeds can only be saved from open pollinated or heirloom types. Seeds saved from hybrid types will likely be genetically unstable and lead to unpredictable results.

Ideally, tomato plants will be grown a half meter apart in rows 1 meter apart. Preferably you will grow about 5 of the same type in a row, and save seeds from the middle 2 or 3 plants. In this way, you will have some genetic diversity by using more than one plant, and you will minimise the already small risk of cross pollination by isolating the varieties from each other with a little space. In doing this, your rate of crossing should be far below 5%. If you can’t do this, or you only have 1 or 2 plants of each variety, don’t worry, you will probably achieve good results no matter what.

There are contradictory reports of wild or currant tomatoes crossing with each other and with other tomatoes. To minimise the risk of crossing, don’t grow these types of tomatoes near any other plants except those of the identical type when saving seeds.

Only save seeds from the most tasty and good looking tomatoes to ensure you do not select any that are genetically predisposed to be of poorer quality. If possible, select seeds from the first few tomatoes that ripen on each plant, as these are likely to have the healthiest seeds.

Okay, on to the seed saving part. Fermenting seeds helps prevent some diseases, and also removes the gelatinous coat on the seeds. If you don’t wish to ferment them, just skip the steps below and spread them out on a coffee filter to dry.

To ferment the seeds, first slice your tomato or tomatoes along their equator, and scoop the seeds into a non metallic fermenting container. If desired, you can add a few tablespoons of water, but it’s not necessary. Cover the container with plastic wrap, and poke a few holes in it. Put in a warm place (about 70F or 22C), protected from direct sunlight, and leave undisturbed for 3-5 days. Fermenting is an anaerobic process, meaning exposure to oxygen will disturb it, so the contents of the container should not be stirred. There will be a layer of slimy mold growing on top and, after fermenting, you should scoop as much of this off as possible.

Now rinse the seeds off by holding the fermenting container under slowly running water. Mostly the seeds will sink to the bottom, and everything else will float. By gently helping the debris over the edge of the container with the running water, you will be left with only seeds. If any seeds do float, they are bad, and you can let them wash away.

Now pour off as much water as possible, and put the seeds on a piece of coffee filter paper to dry. Do not use any other type of paper like a paper towel, or the seeds will stick. At this point you have about a week to completely dry the seeds before they start germinating. Place them in an airy place, protected from direct sunlight.

When they are dry, put the seeds in a paper or plastic envelope and store at a steady temperature in a dry place. Only store them in plastic if they are completely dry.   Some place dark without frequent temperature changes like the back of a closet or cabinet is a good choce of storage location.  Properly stored seeds will last about 10 years.

Storing Seeds

All vegetable seeds have a limited shelf life. This ranges from one year for plants like parsnips to up to 10 years for plants like tomatoes. Exactly what storage life a particular plant has can be looked up in reference books, or perhaps found on the Internet. Some examples of common plants are peppers (3 years), sweet corn (3 years), other corn (5-10 years), and so on.

Storage times for a particular variety of plant seed are very dependant on good storage practices, and as such few commercial suppliers of seeds will guarantee their products beyond the year in which they were sold to you. Because germination rates for seeds will only decline with their age, most seed companies as a matter of good business practice and with the intention of providing the highest quality product to their customers will only sell seeds from the most recent year’s harvest.

What happens if you try to grow old or improperly stored seeds? The quality of seeds is measured by their germination rate. Older or improperly stored seeds will have a lower rate of germination, or may not germinate at all. If you are unsure about the quality of some seeds, nothing will be lost by just trying to plant them and seeing what happens. If they grow, the plants will likely be just as healthy as plants grown from fresh seed. If you want to test some seed for the ability to germinate, just set them in a few layers of paper towels and keep moist and in a warm place for about a week.

The most important things to keep in mind when storing seeds are to keep them dry, at a steady temperature and out of direct sunlight. Beyond this, a cooler temperature is better than a warmer one.

A good choice of location to store seeds is the refrigerator. You must insure they stay dry, and this can be done by first putting the seeds in a plastic or glass container.

For very long term storage of seeds, one of the best containers is a glass jar with a rubber seal. This is because all plastic containers will leak a little bit over time.

For long term storage of seeds they can be frozen. Before freezing seeds, you must ensure they are dry enough or the water inside of them will expand during freezing and damage the seeds. A rule of thumb is if a seeds breaks when you bend it, it is dry enough, otherwise it is still too moist. Freezing seeds can increase their shelf life up to 10 times what would otherwise be possible, for example tomato seeds can be stored up to 100 years, peppers 30 years, and so on.

One of the most common ways of drying seeds for long term storage is to use silica gel. There is a special type of silica gel with a color indicator, that is very useful to seed savers. The most common type available in the US is blue when dry, and changes to light pink as it absorbs moisture. Because this type of silica gel contains small amounts of cobalt, which is poisonous and a potential environmental contaminate, there are also other types available. In Europe the most common types are orange changing to blue, or orange changing to colorless. Color indicating silica gel can be reused over and over, by drying it out in an oven at about 125C (250F) for several hours until it reverts back to its original color.

To dry seeds with silica gel, place them together with an equal amount by weight of silica gel in a closed container. Let it sit for 7 days. Beans and other legumes should not be over dried or they may be damaged, so you may wish to dry these for only 5 days. If you suspect you have over dried a particular batch of seeds, you may wish to germination test the seeds to make sue they will still grow.

Saving Seeds

Information published on saving seeds can often be vague and contradictory. Of course all plants can be a little different, and it’s not often practical to discuss each one in detail. A number of books touch on the subject, and Suzanne Ashworth’s Seed to Seed is one of the best. In this article, I am going to try to give a brief introduction to some of the more important issues on the subject.

The home gardener has to take care that different varieties of the same plant don’t cross pollinate with each other. Exactly what will cross can sometimes be difficult to determine. For example, there are 4 different types of squash, none of which are genetically compatible and will not cross with each other. On the other hand, if you have Queen Ann’s Lace growing wild near your garden, it will easily cross pollinate with carrots you try to save seed from, because it is really a wild carrot.

The Latin name of a plant can often give you a clue. Plants with the same Latin name will almost always cross with one another.

Various techniques can be used to prevent plants from cross pollinating, and one of the easiest is to save seeds from an ‘inbreeding’ plant. Inbreeding plants are self pollinating, and generally don’t cross with neighbouring plants unless either special effort is made to force cross pollination or if insects cross pollinate the plants. Seed savers can usually save seeds from these plants without any special care. Examples of inbreeding plants are beans, peas, wheat and most other grains, tomatoes and peppers. These are some of the easiest plants to save seeds from, and in many cases what you harvest for seed is the same as what you harvest to eat.

Another way of preventing cross pollination is to only plant one of a particular type of plant at a time in your garden. It’s actually possible to plant more than one, as long as you insure that only one of them blooms at a time. For example it’s sometimes possible to grow two varieties of corn, one late and one early, and save seeds from both if they bloom at different times. It’s always possible to grow more than one type, and harvest all but one before any of them bloom.

If plants are separated by a sufficient distance, the pollen is unlikely to be able to travel from one plant to another. If you know what the safe isolation distance is for the particular type of plant you are trying to grow, it’s possible to grow more than one type separated by this distance.

Finally, there are a number of techniques to cage or cover plants to prevent pollen from travelling from one plant to the next, but still grow them side by side. I won’t get into this here.

What happens if plants cross pollinate when you try to save seed? It depends on the plant, but often the results are obvious. Since all plants traits are based on pairs of genes, half from each parent, if two very different plants cross pollinate, the results are likely to be very unique. In this case, you can simply discard the unwanted plant. In some cases, slow genetic contamination can occur over time, but this is less common.

Generally as a home gardener, if you use common sense, are as careful as possible, and accept small amounts of crossing as inevitable, you will be fine. Of course commercial seed producers have to be much more careful.

Beyond inbreeding and outbreeding, there is another classification that is important to seed savers: annuals and biennials. Annuals typically grow through the summer, and produce seed in the fall. Biennials require two complete growing seasons before they produce seed. In areas with hard winters, the plants often need to be dug up and brought inside during the winter. Example of biennials are cabbage and related ‘cole’ plants, celery, parsnips and carrots. Most vegetables are annuals.

While it’s not exactly saving seeds, many heirloom gardeners grow plants that reproduce by root division. Example of this are garlic, shallots, multiplier onions, and so on. Since there is no pollination with these plants, it’s not necessary to worry about genetic material spreading between plants. Because there is always the chance of small genetic variations, the process of roguing described below is very important to keep in mind.

Roguing is a very important issue for seed savers. Basically, this means ensuring you are only selecting seeds from the best plants possible. By selecting seeds from the best growing and most productive plants over a few years, you can develop your own seeds best suited to your own local growing environment.

It’s also important to save seeds from at least a few plants, if possible. This is because there are always small genetic differences from one plant to the next, and saving seeds from more than one plant will help preserve these beneficial differences.

As a rule, you should not save seeds from the same plants you eat from, and there are several reasons for this. Many plants will become inedible after going to seed. Often going to seed means the plants life cycle is complete, and it just dies. Otherwise, if you eat some part of the plant before it goes to seed, like the leaves or the first few seeds the plant produces, the plant has to expend energy replacing these, which means less resources will be available for strong and healthy seed production. If you do save seeds from the same plant you harvest for food, you should first save seeds, then harvest for food later.

Beyond keeping all of these things in mind, saving seeds is just as simple as letting plants first bloom, then collecting seeds from the seed pods that develop.

A future post will explain techniques of storing seeds.

Very Basic Genetics

When Greger Mendel did research on pea plants in the 1860’s, he identified a number of concepts that are important to heirloom plant growers, and people wishing to develop their own plant varieties.

His research centered around the concept of pairs of genes. He said all genetic traits were determined by these pairs of genes, and the genes within these pairs were inherited, one from each parent.

If, for example, you had two parents one with gene pair AB and another with gene pair CD, there were 4 possible outcomes for their offspring all with equal statistic probability:

AB x CD
=======
AC . AD
BC . BD

The order of the genes is not important, in other words AC is identical to CA.

Mendel’s research focused on several traits of pea plants, but for the purposes of this blog post we will look at the height of the plant. He noticed two distinct type of pea plants, those which grew tall and those which were short.

Before experimenting with cross pollinating, Mendel developed varieties of plants that only produced the traits he was interested in, in this case the height of the plant. He did this by discarding plants with the unwanted traits, and growing successive generations until the unwanted traits no longer appeared. This is a process called roguing, and it insured he was working with a gene pool that no longer contained the unwanted traits.

In this way he was able to determine that the tall plants has a pair of identical genes which made them tall, and the short plants had a pair of identical genes that made them short. For the purposes of his research, he referred to the tall gene as T, and the short gene as t.

He then took one of each type, cross pollinated them, and produced offspring as follows:

TT x tt
======= . (F1 Hybrid)
Tt . Tt
Tt . Tt

He referred to this generation as an F1 Hybrid. What he observed was that all of the resulting offspring were identical and all were tall. He explained this by saying the tall gene was dominate, and when it was present with a recessive short gene, the plant was always tall. He knew the genetic makeup of each of the plants was identical, with one of each type of gene, because they had to be inherited from parents which he had previously determined to have pairs of identical genes.

He then took pairs of plants from this generation, and crossed them again to create an F2 Hybrid as follows:

Tt x Tt
======= . (F2 Hybrid)
TT . Tt
Tt . tt

What he observed was that 75% of the resulting offspring was tall, and 25% was short. He said this was because only plants with the gene pair tt could produce short plants, otherwise as long as at least one dominate T gene was present, the resulting plant would be tall.

It was not sensible to talk about successive generations of hybrids (F3, F4, etc), because the genetic composition of the tall parents could no longer be determined, they could either be TT or Tt. This is referred to as genetically instability.

He said if it was desired to produce short plants from a genetically unstable variety, you simply needed to select 2 short plants and the resulting offspring would be short. Since then the T gene would no longer be present in the gene pool, all future offspring would also be short and the variety would be genetically stable.

He said if it was desired to produce tall plants from a genetically unstable variety, it was necessary to produce a number of successive generations of offspring and rogue out the short plants. In this way the t genes are gradually removed from the gene pool, and eventually only the T genes would remain, and the variety would become tall and genetically stable.

This turns out to be somewhat of a simplification of a much more complicated process in nature, nevertheless the basic principles here always hold true. In nature some traits are determined by more than one pair of genes, some traits are sex linked, in some pairs of genes one of them is not completely dominant, and so on. This example with pea plants deals with only one pair of genes, and since one particular plant can have hundreds or thousands of pairs of genes producing their own individual traits, a very complex situation can develop when cross pollinating two different plant varieties.

If you are trying to produce a new variety of plant through cross pollination, the basic idea is that you start by selecting two plants with traits you would like to see combined. In the first (F1) generation all the plants will always be identical, and will be an indication of the sort of plant you can hope to develop during the process of genetic stabilisation. During the stabilisation process, you rogue out plants with undesirable traits, and in the end you have a new stable variety. The stabilisation process usually ranges from a few up to 10 years.

Even if as a gardener you are not interested in in developing new strains of plants through cross pollinating, it’s still important to understand the concept of gene pools and roguing. Plants evolve by means of chance genetic variations, and you always want to preserve desirable new traits and rogue undesirable traits as they appear. You always want to select seeds from the best growing and tasting plants in your garden, to insure any genes associated with these traits are preserved. You should never save seeds from plants that bolt (go to seed) prematurely or otherwise don’t develop properly, or you risk preserving these traits.

For more information on Mendel’s work on pea and other plants, see:

http://www.visionlearning.com/library/module_viewer.php?c3=1&mid=129&l=