

It’s the time of year when many of us start plants indoors. One of the most difficult and expensive things is to figure out what to do about lighting. It’s unusual this time of year to have a source of natural light adequate to start plants indoors, so the choice is what kind of artificial light to use.
The two most common choices of artificial light are fluorescent bulbs or a grow light. Many people avoid grow lights, because they think they are too expensive or too complicated, but this doesn’t need to be the case.
Grow lights are based on 5 main components, together with the interconnecting wires:
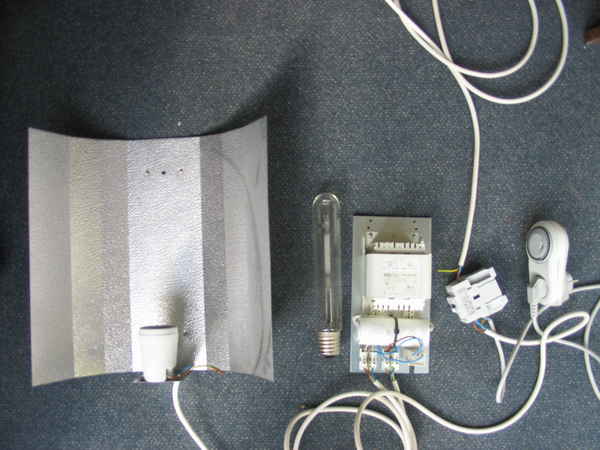
Reflector hood and bulb base: There are many different shapes and sizes. Choose one that fits the shape of the area you will grow the plants. Avoid ones that have pronounced ridges or may in some other way create unusual shadows or bright spots when reflecting the light. Make sure you get a bulb base that matches the bulb you plan to use, the one shown here is very standard.
Light Bulb: There are a few different kinds of bulbs, and I would recommend a sodium vapor type. This is probably the most common type, and other types are mostly used when growing plants to the point where they bloom and would then need a slightly different spectrum. If you have come across some second hand equipment that uses a different type of bulb, don’t be afraid to use it, it should work fine. When choosing a bulb, pay attention to the number of rated lumens with respect to the wattage of the bulb. The more lumens the better, and you can save yourself a lot of electricity by choosing a lower wattage bulb. I use a 400w bulb. Remember that a larger bulb will also generate more heat.
Ballast: The ballast has some circuitry that does several things. It provides the correct voltage to operate the light, it provides some initial voltage spikes to start the bulb when it is first turned on and it provides some filtering to prevent interference with the power grid. The ballast needs to match the wattage and type of bulb you are using. If you use a 400w sodium vapor bulb you won’t have any problem finding a matching ballast.
Relay: The relay is necessary because the grow light uses a surge of electricity when it is first turned on, and this together with the minimum 400w of operating power are too much to safely use a standard electrical timer. The timer operates the relay, which only uses a few watts, and the relay in turn operates the light. In this way the grow light draws its power through the relay instead of the timer.
Timer: Just a standard household timer.
As far as cost goes, here in Amsterdam these things cost roughly the following (in US dollars):
- Reflector hood $7
- Light Bulb $20
- Ballast $50
- Relay $7
- Timer $5
- Loose wire $0.50/meter
For an average person, with an average number of plants, this is more than enough. If you buy a pre-assembled grow light, you will probably pay 2-3 times as much for the same thing. If you make it yourself in this way you have the advantage when something breaks it is easy to fix, and if you have more than one light you may be able to swap parts. All of the parts shown here are very common, and made by many different manufacturers, and generally are easily mixed and matched. When compared to the price of fluorescent bulbs and fixtures, this competes very well.
The only tricky part about wiring it is the relay. It’s hard to go into much detail here, and it depends on the type of relay you buy, but generally they come with instructions. Otherwise, the ballast has a side that connects to the electricity and a side that connects to the light, and is no more difficult that wiring a normal light.
When you are done, you will have some exposed wires. These can be a hazard to children or pets, and you need to think about how to cover them. I use a small plastic trash can to set everything in, but depending on your circumstances you may want to construct a more secure housing.
This is what my light looks like when hung up from the ceiling:

The distance between the light and the plants should be at a minimum, but should be enough so the plants don’t get warm. As a rule, you can never have too much light but you can have too much heat. When your plants start to grow, simply raise the light so it covers more area (you might want to take into account that you are going to raise and lower it when you think about how to attach it to the ceiling). There will come a point that plants on the edges don’t get enough light. At first you can probably deal with this by rotating the plants, but eventually you will need to buy a second or higher wattage light. My light is enough for an area of about 2×3 meters (2×3 yards).
Take care to use a room with good ventilation. Not only can the grow light generate a lot of heat, but as your plants get bigger they will need fresh air too.
hey, thanks…thinking of doing the greenhouse think in my attached shed. i’m heating it now in the winter with a simple electric baseboard heater and planning to use the lights as heat instead. then i’ll sell some plants in spring to recoup the heating costs. do you have any suggestions on the cheapest suppliers to acquire the neccessary components to pull this off? thanks again for the great info for us rookies !
Hi Greg,
My computer tells me you’re in Minnesota. I’m in Amsterdam, Netherlands. I’m afraid I have no idea about suppliers in your area, but these are the same lights used in public outdoor spaces, so you might have a look for companies that sell this sort of thing. Good luck!